Quick guide
Your digital field notebook: record weeds, insects and diseases with their location, photos and audio, even with no signal, and build the report in a minute.
1Install it on your phone
FIELD notebook installs from the web browser, without going through the Play Store or App Store. It sits on your home screen like any other app and works with no signal.
Android
- Open fieldnotebook.com.ar in Chrome and tap Try it free (or Sign in if you already have an account).
- Tap Install app on the start screen, or the ⋮ menu → Install app (or Add to Home screen).
- Open it from the new icon.
iPhone
- Open fieldnotebook.com.ar in Safari (not Chrome) and tap Try it free or Sign in.
- Tap the Share button (the square with the up arrow).
- Choose Add to Home Screen → Add.
2Create your account
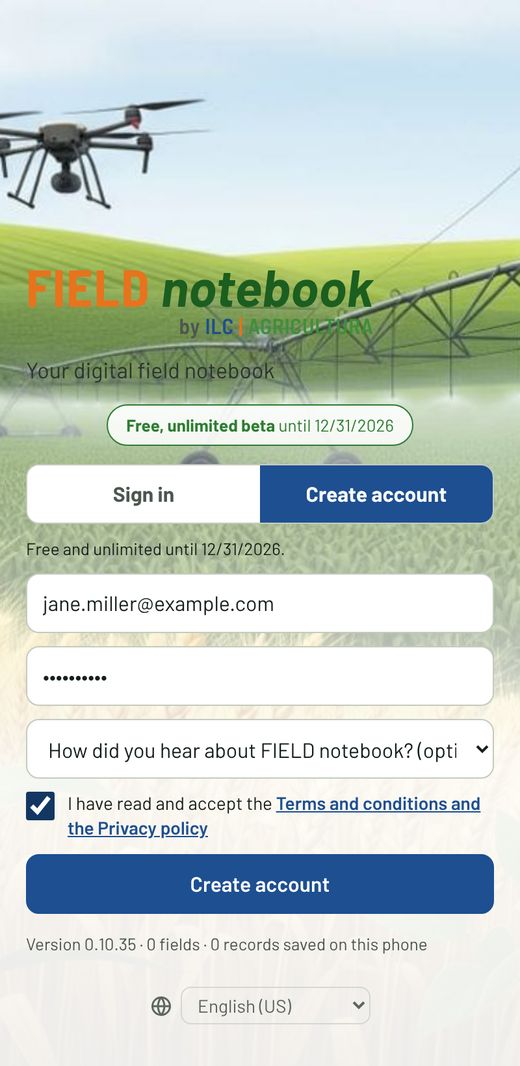
- Tap Create account, enter your email and a password of at least 8 characters.
- If you like, tell us how you heard about the app. Accept the terms and tap Create account.
- You'll get an email from FIELD notebook (check Spam). Tap the confirmation link.
- Go back to the app and sign in with your email and password.
With the same account you can use it on your phone, tablet and computer: everything you enter shows up on the others.
Before you start: your details for reports
In Export → Settings, enter your name the way you want it on reports (for example, Jane Miller, CCA) and your license or certification number.
3Load your fields
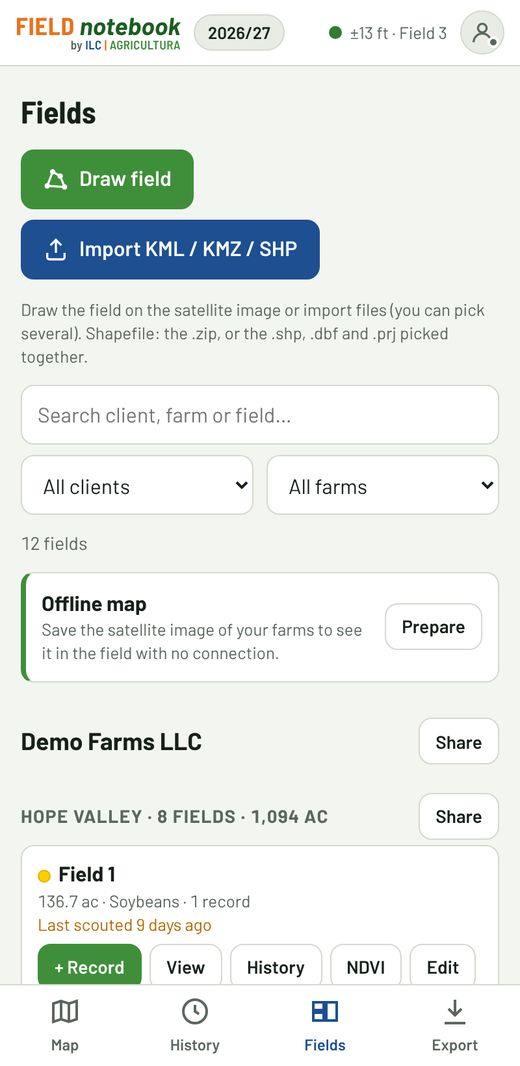
Fields are organized by client → farm → field, and each one keeps its crop for every season. There are two ways to load them, from Fields:
Import
Import KML / KMZ / SHP: choose one or more files. For a Shapefile, upload the .zip, or pick the .shp, .dbf and .prj together. The app calculates the acres automatically.
Draw
Draw field: mark the boundary on the satellite image by tapping the corners. You can drag the vertices, and they snap to neighboring fields. With + Vertex at my location you mark a corner while standing in the field.
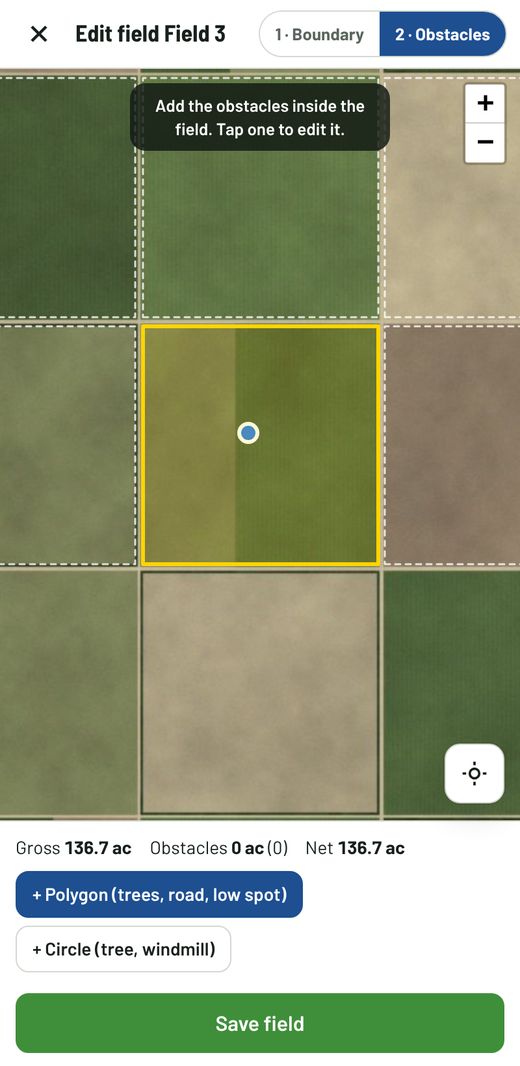
In the Obstacles step you subtract trees, low spots or a windmill (polygon or circle) and instantly see gross and net acres.
On each field, Edit lets you change the name, client, farm and the season's crop. Each field shows how many days ago it was last scouted.
Above the list, the search box finds a client, farm or field as you type part of its name (you can combine words, e.g. ombú 4), and the two menus filter by client and by farm.
4Scout in the field
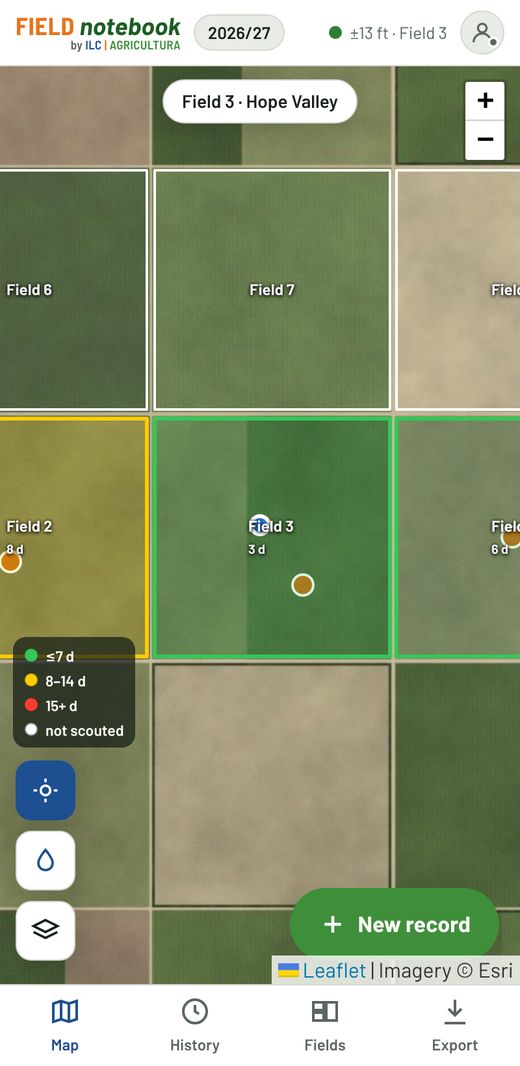
On the Map you see your fields, your location and earlier records. At the top it shows which field you're in, detected by GPS. The map follows you: when you move to another field or farm it centers on your location. If you drag it with your finger it stops following; to resume, tap the location button (it stays blue while following).
Each field is colored by its last scouting visit: green up to 7 days, yellow 8 to 14, red 15 days or more, and white if it has no records yet. You can see at a glance what still needs scouting.
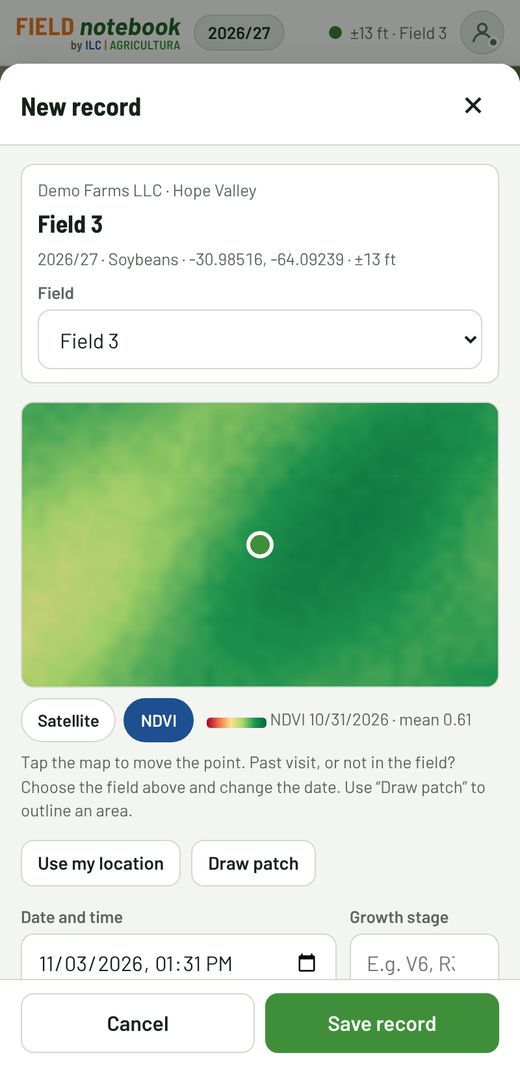
- Tap + New record. The field, date and location fill in automatically.
- If the field is wrong or you're entering a past visit, change it at the top and tap the map to move the point.
- If there's already a record for that field today, the app offers to add to it.
- Under the record's map choose Satellite or NDVI: with NDVI you see crop vigor as you walk and can place the point where the problem is.
Issues
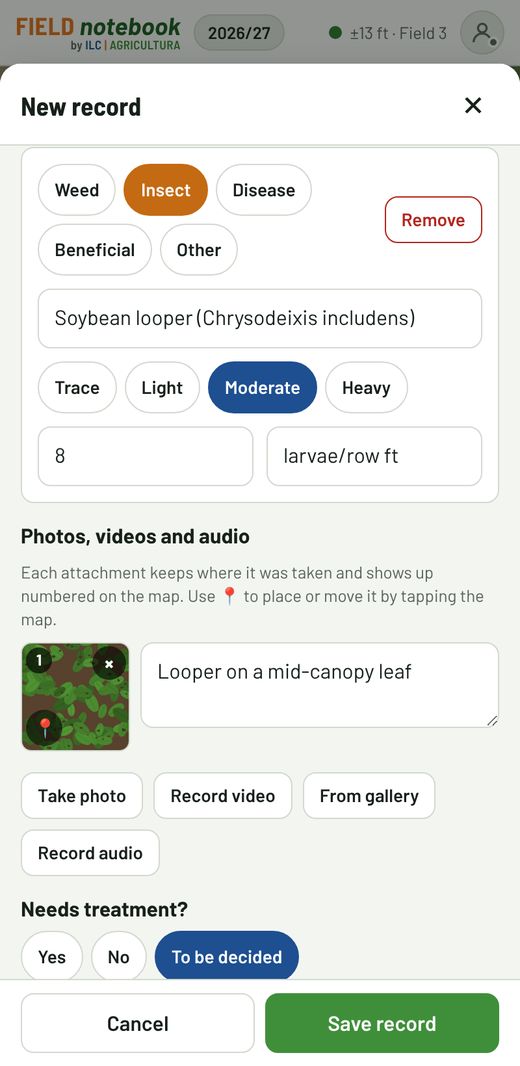
+ Add for each weed, insect, disease or beneficial. Type the name (common or scientific: the app suggests the ones you've used), choose the pressure (Trace · Light · Moderate · Heavy) and, if you want, a value with its unit: plants/ft², larvae/row ft, % defoliation…
Photos, videos and audio
Each attachment keeps where it was taken and shows up numbered on the record's map. Add a comment under the photo. Use 📍 to place it by hand. You can also Dictate note or Record audio.
Field condition, treatment and documents
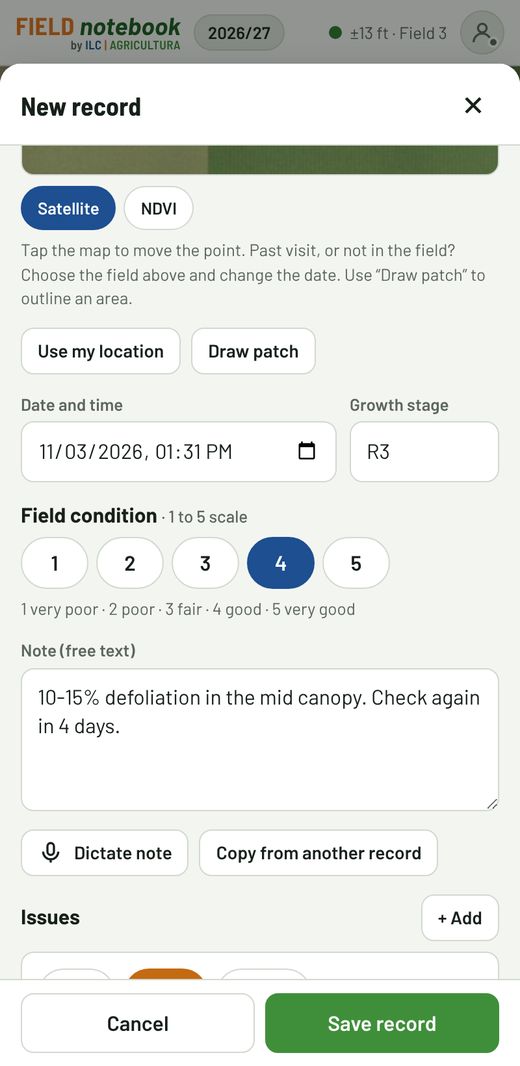
- Growth stage: pick from the list (V6, R3, milk, dough, dent, fallow…) or type it.
- Field condition: 1 to 5 scale (1 very poor, 3 fair, 5 very good). It works for fallow fields too.
- Needs treatment? Yes, No or To be decided.
- Rec # and Work Order #: if you don't have them yet, fill them in later from the history.
With Draw patch you outline an affected area. Tap Save record.
5History and work orders
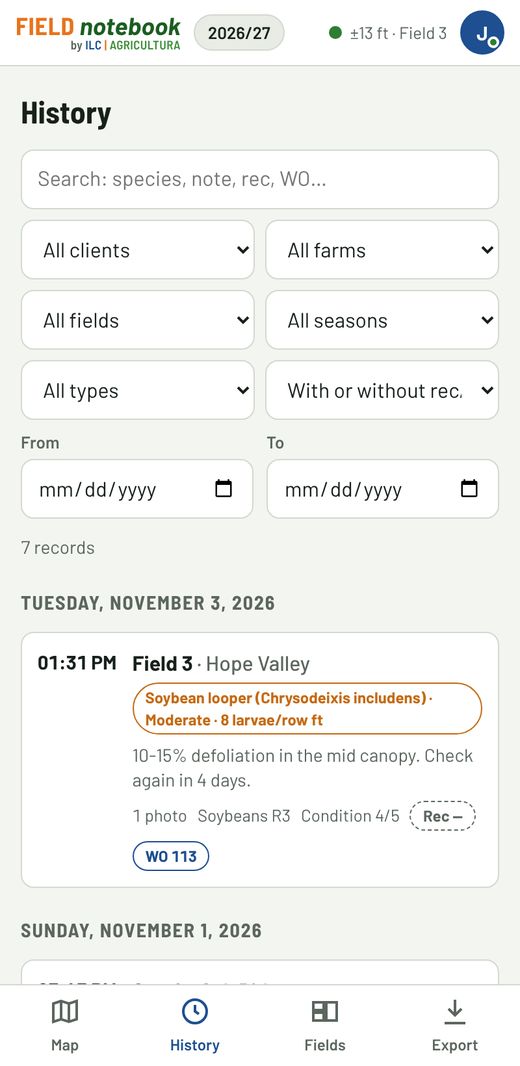
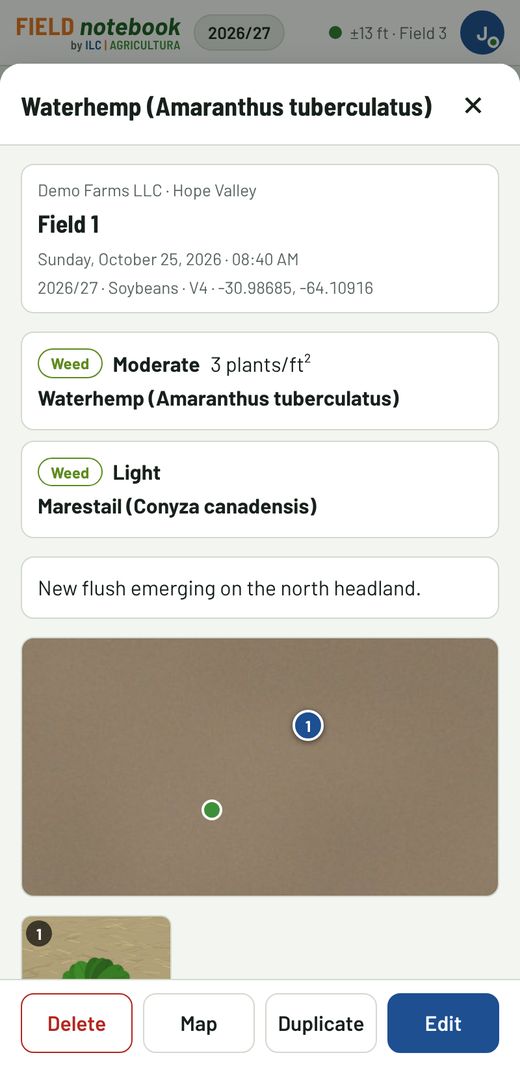
History has everything you've entered, sorted by date. Filter by client, farm, field, season, type, dates or text (species, note, rec or work order number).
The “To treat, no rec/WO” filter shows what still has no recommendation or work order.
Fill in later
Tap a record → Edit to add the rec number and work order number, fix details or add photos. The Rec – and WO – tags show what's pending.
Create the work order
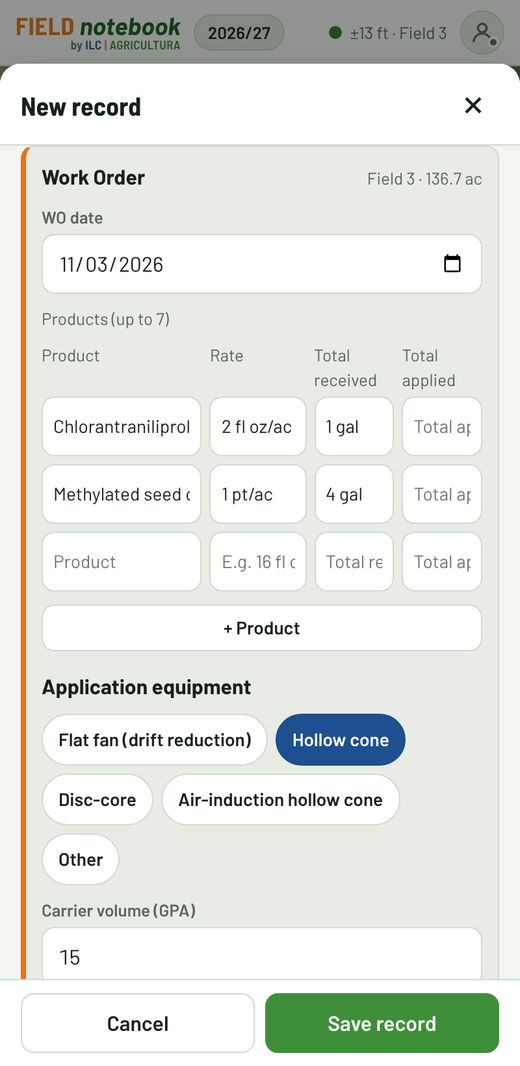
In the record, tap Create WO next to the work order. The app gives it the next number after the last one you used, and the WO is saved in that scouting record. With Copy from another WO you bring in the products, rates, equipment and remarks from an earlier order. When you enter the rate, the total received fills in automatically as rate × field area (you can change it).
- WO date.
- Products: up to 7, with product, rate, total received and total applied.
- Application equipment: nozzle (flat fan with drift reduction, hollow cone, disc-core, air-induction hollow cone or other), carrier volume (GPA), pressure (psi) and speed (mph).
- Crop advisor's notes: instructions for the applicator.
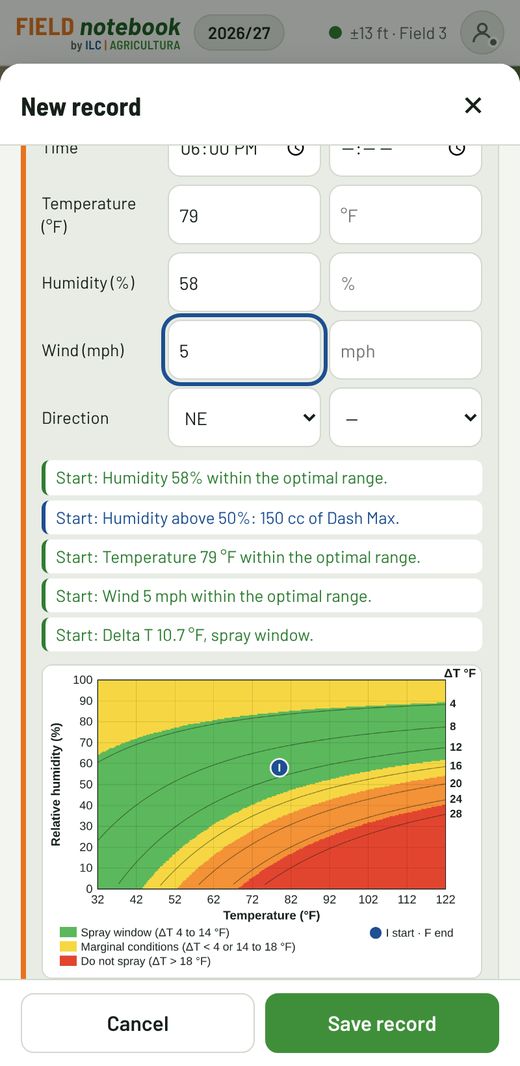
- Spray conditions at the start and end: date, time, temperature (°F), humidity, wind (mph) and direction. The app warns if they're outside the optimal range, suggests the adjuvant rate based on humidity and calculates Delta T (in °F): it marks it on a band chart (spray window, marginal, do not spray) for the start and end.
- Recommended parameters: they come preloaded and you can edit them; with Always use these parameters they stay for future WOs.
Download or send the WO (PDF) saves the record and builds the order to send to the applicator by WhatsApp or email: it includes the start and end conditions table for the applicator to write down actual conditions, the reference Delta T chart, a field sketch with north arrow and scale, a box for the applicator's comments and signatures. It states that it doesn't replace the label or recommendations required by local regulations. Work orders are also in the Excel file, on the Work orders sheet. For management, Export → Work orders Excel downloads a spreadsheet with only the WOs (using the History filters): product-level detail, whether each one is applied or pending, and summaries by product and by field.
To change a saved WO, open the record and tap Edit WO; to remove it, Delete WO. The scouting record, its photos and audio are not deleted.
6Work as a team
You can share a whole client, a farm or a field with a colleague, a scout or the grower. There's a single copy of the data: what each person enters shows up for everyone, with no duplicate records.
Share
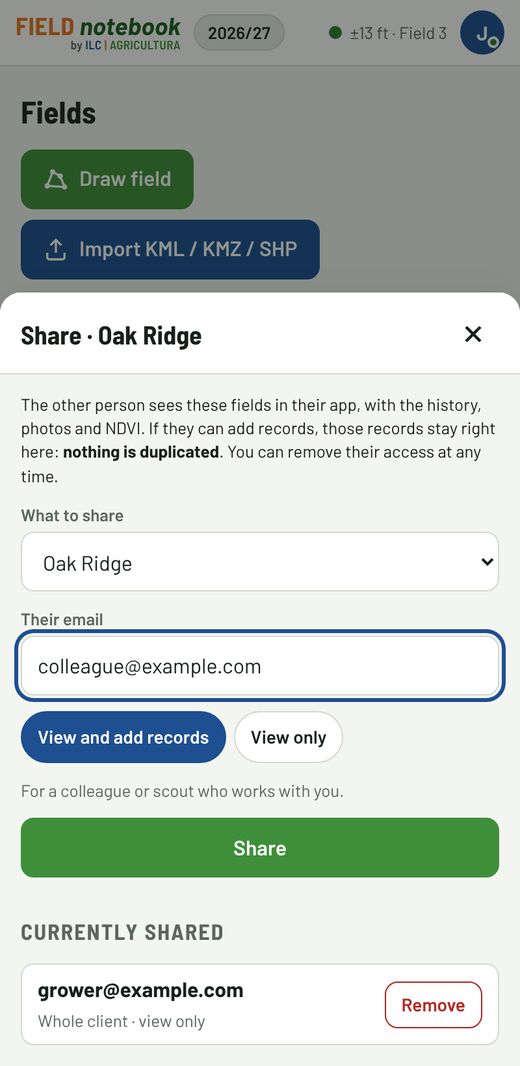
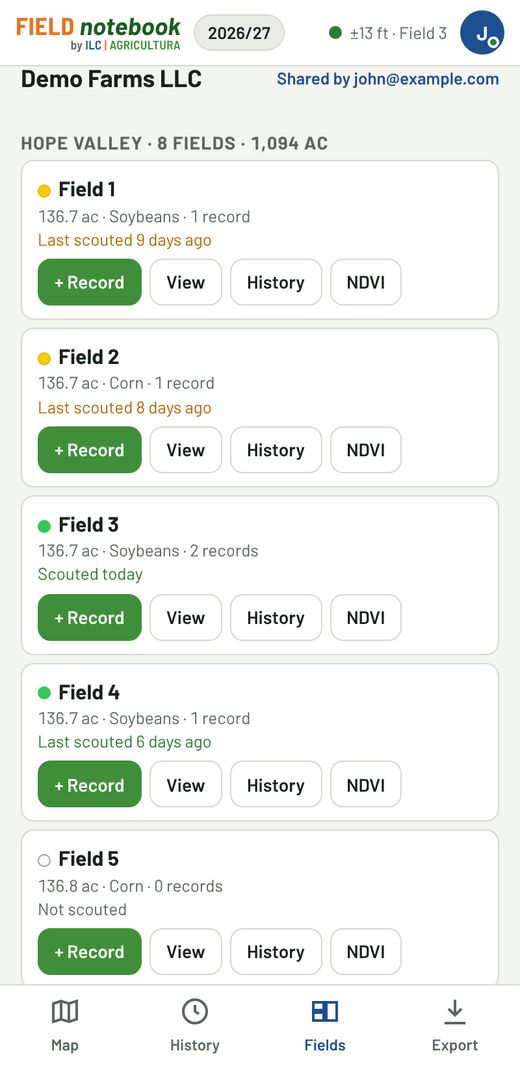
- In Fields, tap Share on what you want to share: next to the client, the farm, or on the field. It comes preselected, and you can change it under What to share.
- Enter the person's email and choose View and add records (colleague, scout) or View only (grower).
If the person doesn't use FIELD notebook yet, it shows up when they sign up with that email. Use Remove to take away access at any time. Anything you've already shared shows Shared (n), with the number of people.
What you receive
Shared fields appear in Fields labeled “Shared by…”, with their history, photos and NDVI. Records stay in the owner's account, and the history and report show who scouted each one. Only the owner can edit the boundaries.
7Field NDVI
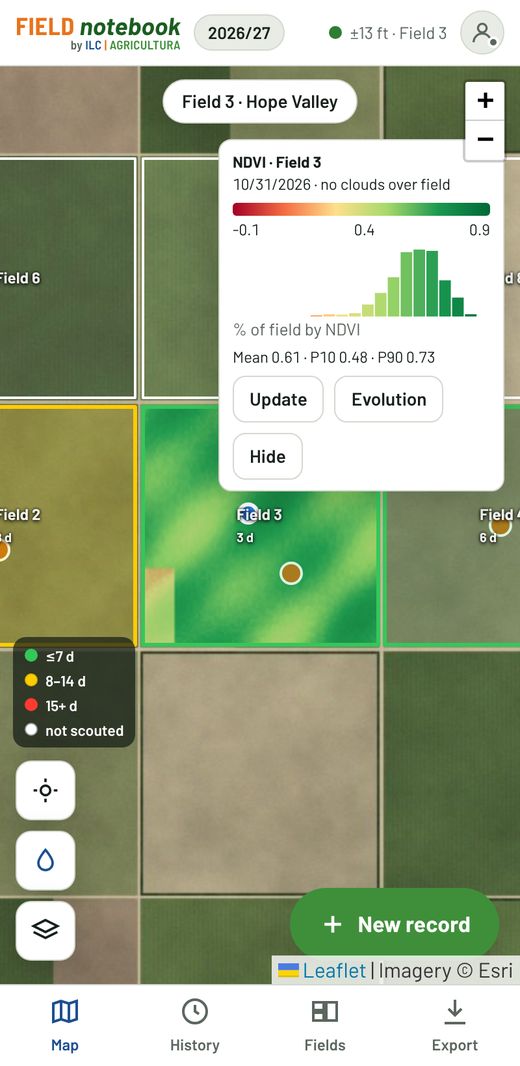
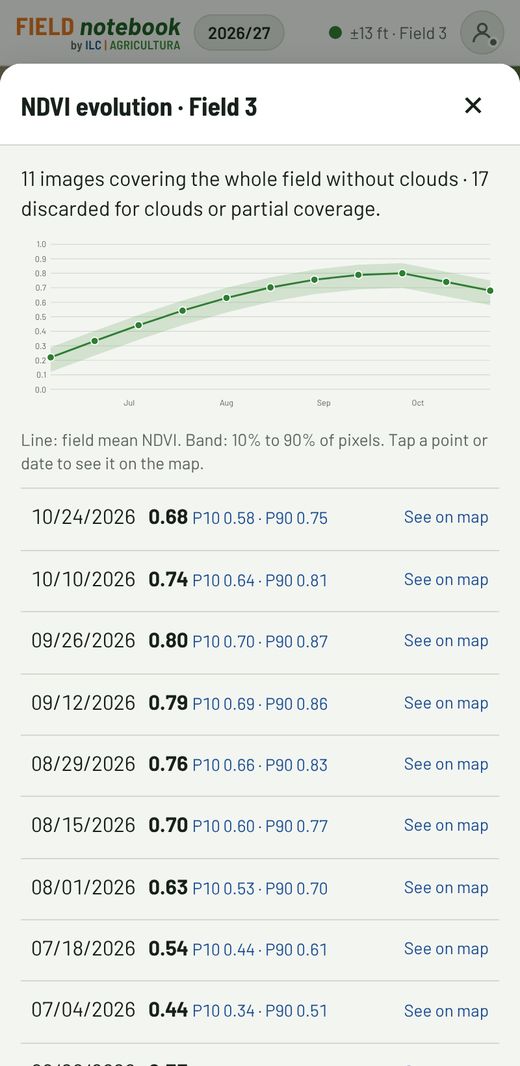
In Fields, tap NDVI on the field and choose:
- Latest full cloud-free image: the most recent Sentinel-2 image that covers the whole field with no clouds, shown on the map.
- Evolution by dates: pick a period of up to 6 months and the app plots the mean NDVI curve from all the good images. Tap a date to see it on the map. Finding and processing all the images can take more than a minute: keep the app open; the second time it's instant.
- Dark green: more vigor. Yellow and red: less vigor (low spots, stand gaps, weeds, bare soil).
- The legend shows the image date, the mean, the P10 and P90 percentiles and a histogram: what % of the field falls in each NDVI range.
- Update looks for a newer image; Hide removes it from the map.
- You can also see it inside each record, with the NDVI button under the map.
8Rainfall
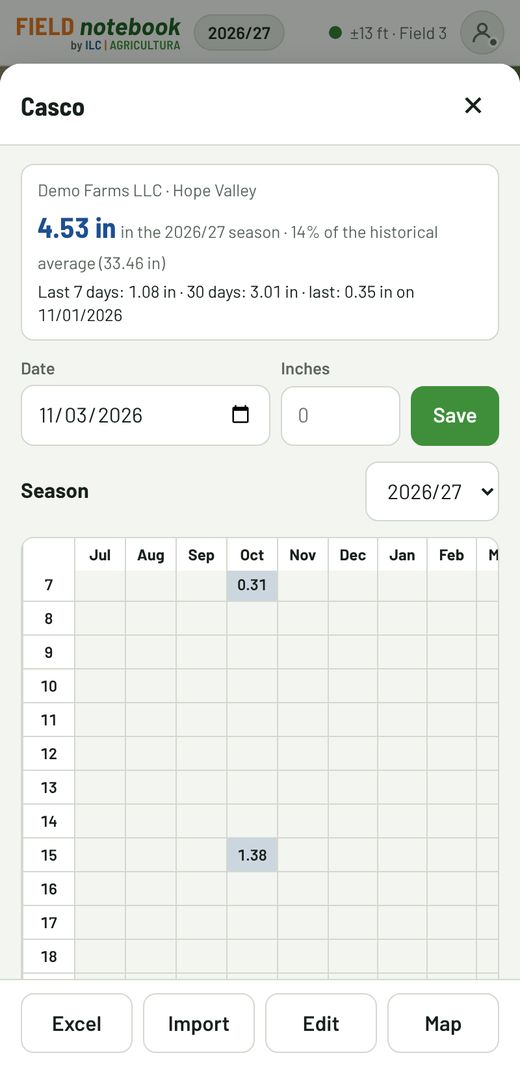
Record each farm's rainfall in the app instead of a paper sheet or a spreadsheet. On the Map, tap the raindrop button.
- + Rain gauge: give it a name (“Headquarters”, “Shop”). It's placed where you're standing, or at the map center. The area's annual average is optional.
- To record rain: tap the raindrop on the map, enter the date and the inches and tap Save. If you enter the same day again, it's corrected.
- Below is the season sheet, July to June, with each month's total and the running total. Tap a cell to correct a day; leave it empty to delete it.
- Import reads your spreadsheet (days 1 to 31 per month) and Excel downloads it in the same layout.
- Each field's card shows the season's rainfall and the last 30 days from its farm's rain gauge.
- To fix or delete a rain gauge: Edit. If you share the farm, people who can record data can also log rain.
9Reports and export
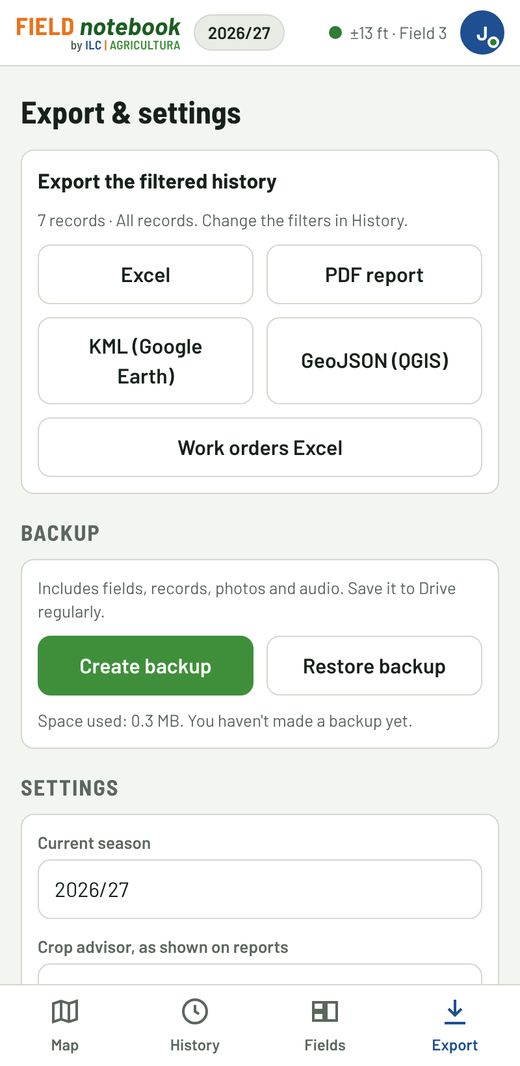
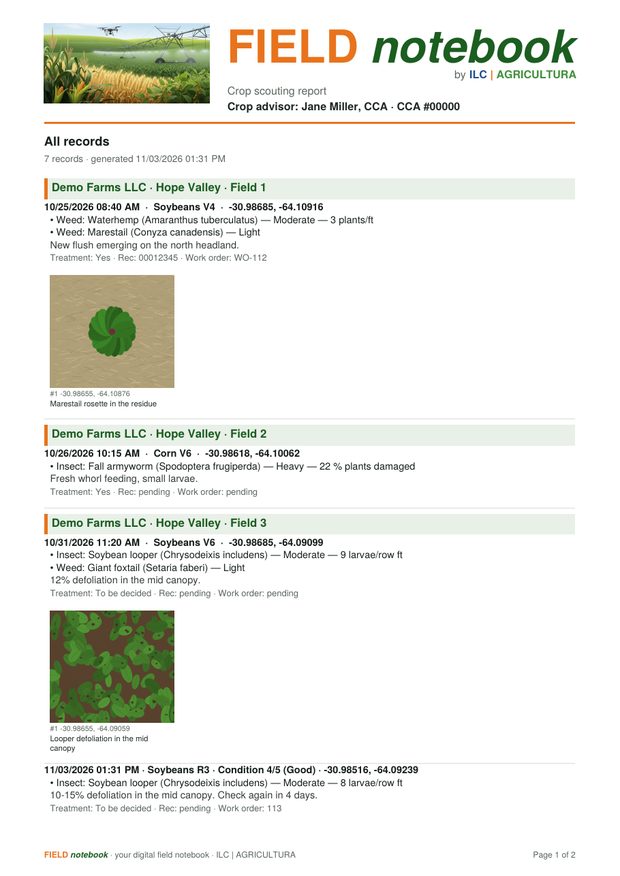
Export exports whatever is filtered in History: for example, one client and one week.
- PDF report: with your crop advisor details, each visit, its issues, photos with comments and space for a signature.
- Excel: sheets for records, issues, attachments and work orders, ready to sort.
- KML (Google Earth) and GeoJSON (QGIS): points, patches and attachments with their location.
When it's ready, choose Download to this device or Send or share… to send it straight by WhatsApp or email.
Backup
On the same screen, Create backup builds a .zip with everything (fields, records, photos and audio). It's an extra backup on top of the cloud.
10Offline and sync
The app is built for the field: with no signal you can enter and edit records, see the history and build reports. Everything is saved on the phone.
Your account button, at the top right (with your initial), has a dot that shows the status: green, everything uploaded; yellow, changes are waiting for a signal. As soon as the connection is back, it uploads automatically. To force it, tap that button → Sync now. Your password, feedback, help and Sign out are there too.
- Open the app and tap Sync now.
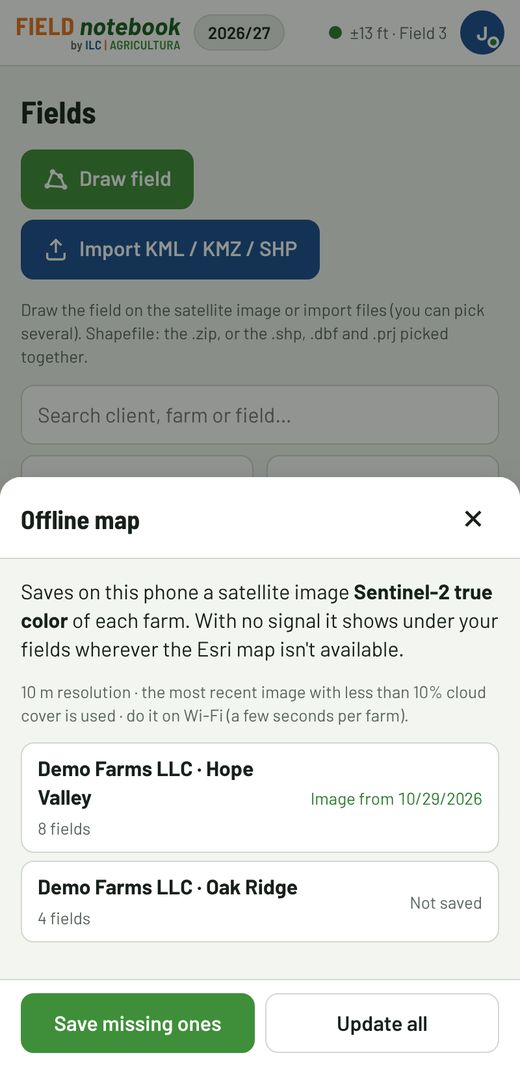
- In Fields → Offline map → Prepare → Save missing ones: it saves on the phone a Sentinel-2 satellite image (true color, 10 m) of each farm, shown under your fields when offline. Repeat it now and then with Update all.
- If you want the detailed Esri map offline, browse the fields you'll visit with a signal, at the zoom you use: that area stays saved.
- If you'll check NDVI, open it beforehand: the latest one stays saved.
Without a signal you can't: create an account, get a new NDVI or send files.
11Help and feedback
We're in beta: your feedback shapes what comes next. From your account button (top right) → Send feedback or a suggestion, tell us what helped, what's missing or what didn't work.
For any question: soporte@fieldnotebook.com.ar.
Your data is yours: you can export it at any time. Read the Terms and Privacy policy.
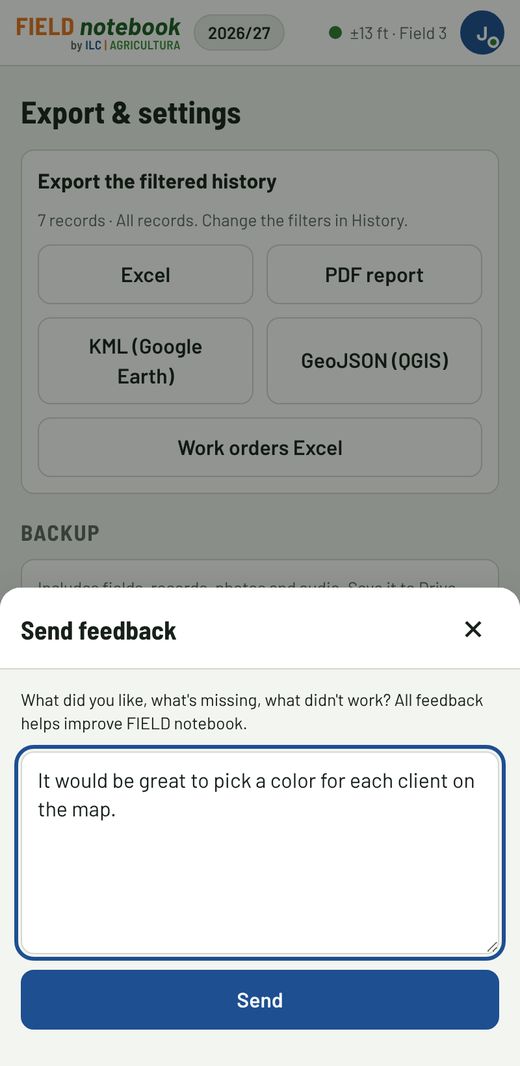
The screens in this guide use made-up data and an illustrative satellite background.
← Back to FIELD notebook